Nothing says, "last-minute Halloween craft for preschoolers" quite like these super quick, inexpensive, fun matchbox monster mouth favors. I whipped them up a couple of years ago for kiddo, but now that she's practically grown (in elementary school), her little sister's preschool class can reap the rewards of this old school spooky treat box.
Swing by my Momtastic post to see the entire DIY tutorial.
Showing posts with label candy. Show all posts
DIY Abstract Art Heart Valentine's Day Favors
It's finally candy month! Er, um I mean the month of love. Yes, Valentine's Day is almost upon us, and the kids and I spent a snow day crafting our little hearts out (pun totally intended). We recently were invited to see The Children's Theatre production of The Frog Bride, and the vibrant, abstract backdrops in the play inspired our Valentine's favors.
The play was unlike any children's play we'd ever seen before. Instead of elaborate sets and a whole cast of characters, The Frog Bride features only writer/director David Gonzalez, pianist Sergei Prokofiev, and violinist Daniel Kelly set against a multi-media backdrop. The story all comes alive in Gonzalez's colorful narrations, which are partnered with abstract, watercolor splashes on the screen. This uncluttered performance really allowed the kids to use their imagination to envision the characters, the scenario, and the story's clever plot twists. The jazz music kept everything lively and engaging.
These DIY Abstract Art Hearts are perfectly unique and wonderfully inexpensive. Even my youngest was able to get fully involved in this project to create watercolor Valentine's cards for lots of friends and family. They're impossible to mess up, and that's a full-on win in my book. Because, ain't nobody got time for frustrated kids. Check out the entire how-to below.
The Biggest Little House Favor Printables
Last week, we were treated to an advance performance of The Children's Theatre's The Biggest Little House. The story is based on the book by Djemma Bider, and it's full of sweetness and laughs. We've seen several plays in the large theater at CTC, but none in the intimate Cargill Stage theater. We like to really get into plays, which you already know because of this and this. We read the book, watch the movie, then watch the play if all of those options are available. Then, we discuss which format we liked better and why. I really think plays bring books and movies to life in a way that uniquely interests kids.
During The Biggest Little House, which is perfect for kids between two and five years old, kids sit on low benches right at the edge of the stage. They're free to laugh, pop bubbles, and enjoy the various characters who live together in a tiny house that is bursting with love. Our girls liked it so much, that I cooked up this little DIY project just in time for Valentine's Day. Just like the holiday, this little play is full of love, love, love.
Since the play focuses on a variety of woodland animals living in harmony together, I thought it'd be nice for several different candies to reside peacefully in this favor bag (right before taking residency in my mouth!).
Check out the quick and easy tutorial below. If you haven't already made plans to see The Children's Theater's The Biggest Little House definitely add it to your to-do list. It's running now through March 15th, and it's perfectly tailored to tykes. Even the adults giggled a time or two. Seriously, what better way to get the kids excited about their upcoming theater date, than by reading the book and crafting up a cute little favor bag or two?
Supplies
this favor template
2.5" x 4" white envelopes
8.5" x 11" paper
washi tape
scissors
candy, candy, candy
Instructions
Download and print this favor bag template in black and white onto a sheet of 8.5" x 11" paper. Tape each envelope into position using washi tape. Unlike transparent tape, washi is less sticky and won't rip your envelopes when you remove them from the paper.
Print the template, this time in color, to transfer the images onto each favor bag. Gently remove each envelope from the paper.
Cut the tops of the envelopes into roof shapes, if you wish, and fill with a variety of small candies.
Kiddo's Retro Modern Birthday and Dessert Table
Whew! Kiddo's 6th birthday has come and gone. Now that I'm rested up from all that designing, planning, and crafting, it's the perfect time to share some pics and projects. You know me, I had to DIY some cute stuff and design a dessert table to customize her bash, but I didn't want to spend a lot of money. So, I created an inexpensive photo booth backdrop, a retro modern dessert table backdrop, some milk bottles, and a colorful dance floor for breakdancing.

The fab Sydnee Bickett captured all of the lovely details, and I'm sharing tutorials for the projects on Momtastic. I also give my 5 Tips to Makeover a Bland Birthday Venue, which helped us save some money. Check that out, and be sure to swing by to learn to make your own:
DIY Retro Diamond Paper Plate Backdrop
DIY Number Outline Birthday Photo Backdrop
DIY Retro Diamond Color Block Bottles

DIY Retro Diamond Paper Plate Backdrop
DIY Number Outline Birthday Photo Backdrop
DIY Retro Diamond Color Block Bottles
These little diamond color block milk bottles were another easy, inexpensive DIY. I wrote up the tutorial for Momtastic. Swing by for the how-to.
Last year, I made a little cake for her. This year, we had a million (read: 14) kids in attendance, so cupcakes seemed like a more manageable option.
This giant number 6 photo booth backdrop was easy and really inexpensive to make. You've got to check out my tutorial.
I danced as much as the kids, and this pic of my two girls dancing together makes me so happy!
Filed:
backdrops,
birthday,
candy,
cupcakes,
dessert meets design,
dessert table,
diy,
kids birthday,
popcorn
1 Comments
Search for Your Awesome Dessert Table + Party
I basically won the blogger lottery, when Bing recruited my Confetti Pop partner, Maddy, and I to co-host a party with Alison of The Alison Show for the Minneapolis leg of her Search for Your Awesome tour. We invited lots of great, local bloggers, business owners, and creatives and taught the in-person version of The Style Lab, our photo styling e-course. Here are few fab pics that photog Gene Oh shot of the festivities, including the dessert table I designed (Hello, macarons, gold flamingo cookies, and candy!) and Studio Fleurette's florals. Don't forget to check out the tote bags Maddy designed.
Obviously, I had to make this ridiculous face. Seriously, what is that face?!?
And, you know I had to grab a pic with my girl, Alanna. She helped us during the party and even stayed to clean up after this big, crazy bash. Thanks, giiiirl!
We had so much fun, and we always love any opportunity to teach our e-course, The Style Lab, in person. To all the attendees, thanks for joining us! And of course, none of it would be possible without Bing.Styling + Concept: Shauna Younge, Maddy Hague
Co-host: Alison Faulkner
The Style Lab photo styling class taught by Confetti Pop
Catering: Chowgirls Killer Catering
Photographer: Gene Oh Photography
Florist: Danielle Erickson
Venue: 514 Studios
Graphic Designer: Tosha Seeholer
Videographer: Modern Atelier
A Kid in a Candy Store Dessert Table + Fab Kids Giveaway
I know, you're like, "What?!? Two posts in two days? What is this insanity, Shauna?!?" Calm down. I have another fun post headed your way, but I don't want to send you into sugary heart palpitations, so I'll wait until next week to roll that one out. Or, will I?
You probably saw this sneak peek of a tiny dessert table or this pic of the little one gleefully frolicking through the office on my IG a couple of weeks ago.
Well, now you can see what I created this teeny candy-filled dessert table. I used it as a backdrop for kiddo to do a little modeling for Fab Kids.
And, check kiddo out in these other cute dessert DIY posts.
Kiddo's Wonderland Dessert Table
DIY No-Sew Donut Costume
You probably saw this sneak peek of a tiny dessert table or this pic of the little one gleefully frolicking through the office on my IG a couple of weeks ago.
Well, now you can see what I created this teeny candy-filled dessert table. I used it as a backdrop for kiddo to do a little modeling for Fab Kids.
I wrote about my shopping experience with this subscription shopping site on Momtastic, so be sure to check out my review. But, for my fellow candy addicts, I've also got lost of fun pics of kiddo playing around like, well, a kid in a candy store.
Did I mention that Fab Kids and Momtastic have teamed up to offer a great giveaway? Yeah, well, they are. Swing by, and enter to win!And, check kiddo out in these other cute dessert DIY posts.
Kiddo's Wonderland Dessert Table
DIY No-Sew Donut Costume
DIY Frosty the Snowman Favor
I love how easy it is to make a kid's day. Both of my girls would squeal if they saw these little snowman favors next to their plate on Christmas day. My older one would definitely say, "Oh my gosh! These are fab-u-loooooous!" My little one would just shovel all the candy in her mouth, you know, because she's a mini-me.
I made this little guy for Day 16 of Confetti Pop's Craftsmas. Swing by to get the how-to for him and all of the other 2013 holiday projects.
images: Todd Hafermann
I made this little guy for Day 16 of Confetti Pop's Craftsmas. Swing by to get the how-to for him and all of the other 2013 holiday projects.
images: Todd Hafermann
DIY Funny Bone Skull Favors
I'm always trying to come up with affordable, quick DIYs to celebrate the holidays with the kids. When they're little, it's pretty easy to get them excited. This year, I came up with these funny (and delish) skull favors for Halloween. A little thought bubble asks a joke, while a chain of candy and a little card inside the cranium reveal the joke's answer.
I think these would be great sitting next to a kid's breakfast plate on Halloween morning, or as a special treat when they come home from a night of cruising the neighborhood for candy. I'm sharing the tutorial on Confetti Pop, so swing by and check it out!
Sweet Idea: DIY Creepy Eyeball Favors
I starting to think Halloween is my holiday of choice. Not because I like scary stuff, but because I love how many creative candy crafts seem to pop up around the web this time of year. Yesterday, I shared these DIY Monster Mouth Favors with you, and today I'm back with these creepy eyeball party favors that Amelia of The Homebook made for You Are My Fave.
You know you want the tutorial for these. Swing by You Are My Fave to get the details.
Sweet Idea: DIY Monster Mouth Halloween Candy Favors
It's always hard to come up with creative Halloween treats that are school-approved. I designed these DIY Monster Mouth Halloween Candy Favors for kiddo to take to her school party this year. Just peel back the spooky greeting to reveal the kid's name. Cool, right?
They're even big enough to fit wrapped mini chocolate bars. Bam! Take that school rules!
Of course, the tutorial is on Confetti Pop. Check it out!
Sweet Idea: DIY Candy Sushi
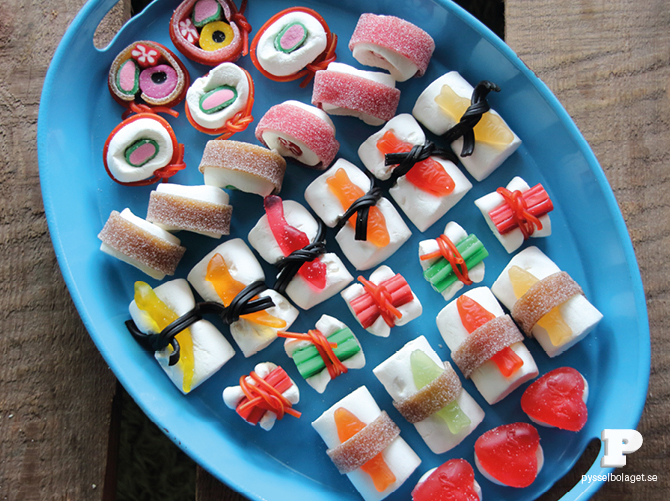
I've never thought about a little sushi party for kiddo, but these adorable DIY candy sushi are making me think of at least stuffing a little bento box full of them for her to have for lunch one day. Look at those bright bundles!
images: Pysselbolaget
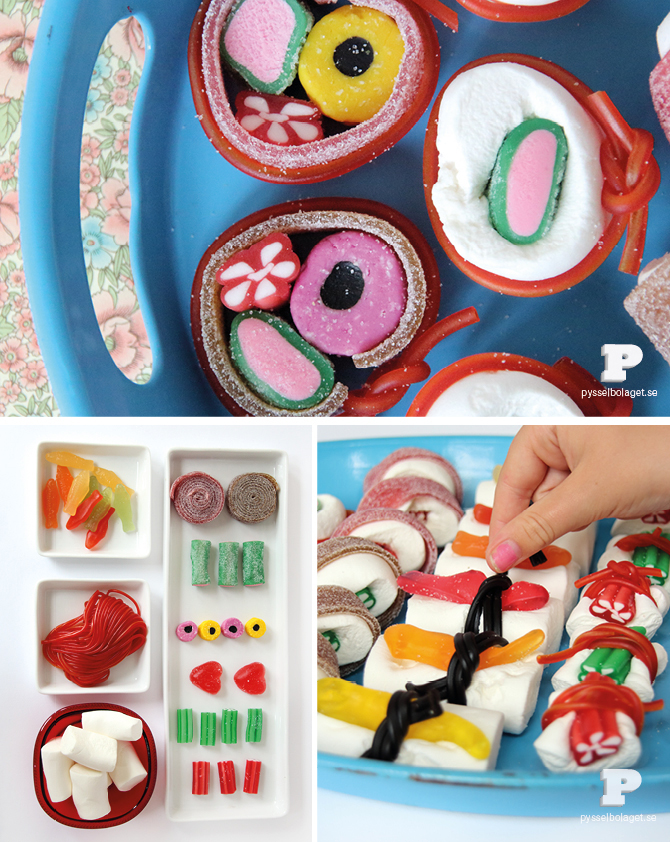
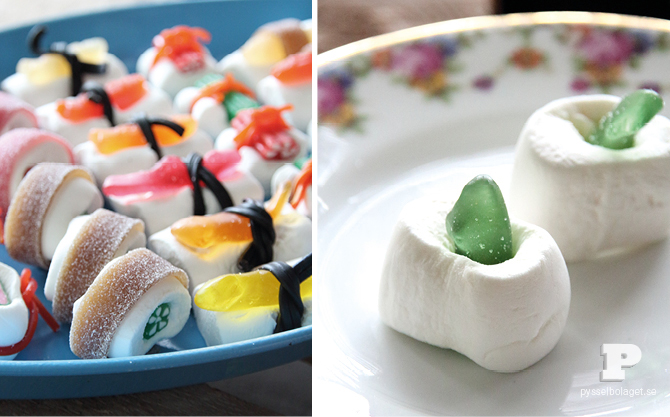
I love that these simple jelly candies and marshmallows can come together to make sugary replicas of sushi. Wouldn't this be a fun kid's party theme?
Arranged on a tray like this, the "sushi" is colorful and modern with mostly white bases and pops of vibrant pink, orange, yellow, and green. Red and black licorice strands tie each bundle together.
Check out even more pretty pics on here.images: Pysselbolaget
DIY Divided Nautical Favor Box
You probably already know the always-fabulous Mrs. Lilien. Well, she's expecting baby #3, and we were thrilled to create these favor boxes for her nautical baby shower. We teamed up with the Candy Warehouse crew to fill each DIY favor box with four color-coded sweet treats.
I love this bright, unexpected palette! Aqua and orange is so fun.
Swing by Confetti Pop to check out the tutorial, and hook your guests up with a variety of sweets.
DIY Handlettered Favor Box
I love this latest Confetti Pop project. It's just in time for the beginning of wedding season, but it's also perfect for birthday or graduation goodies.
Love these colors, don't you? Swing on by Confetti Pop to get the full tutorial.
Dessert Meets Design: Sequins & Champagne Dessert Table
A couple of months ago, Jen, Sarah, and Tara invited me to join them and some other talented ladies for a fun, graphic bridal shoot. I brought the sweets, of course, and we got to work. Today, Ruffled featured our shoot so I can finally share it with you.
Thank you for inviting me to join in the shoot, Jen, Sarah, and Tara! It was great to meet everyone.
shoot concept: Jen Meneghin, Sarah Tillges, Tara Bailie
images: Jen Meneghin
jewelry: Sarah Vonne
florals: A Day in Provence
makeup: Romeny Chan & Alice Bernman of Castor & Pollux
hair: Ashley Haley of Bang Bang Salon
dress: Sixpence Boutique
desserts: Shauna Younge Dessert Tables
stationery: Armato Design
model: Anne Murphey
Bold black and white was accented with gold ribbon and a tissue tassel garland. I used the Armato stationery's champagne bubble motif to inspire the custom popcorn boxes and chocolate wrappers I designed. Here's are the paper goods.
I also created a cake topper of gold, glitter that was reminiscent of the invite's champagne bubbles. White chocolate truffles were customized with gold sanding sugar, while gold gum balls added youthful fun to the table.
I worked with such a fab group of ladies. Please be sure to give them some love in the comments and visit their sites as well. Want to see even more? Check out the full gallery on Ruffled.Thank you for inviting me to join in the shoot, Jen, Sarah, and Tara! It was great to meet everyone.
shoot concept: Jen Meneghin, Sarah Tillges, Tara Bailie
images: Jen Meneghin
jewelry: Sarah Vonne
florals: A Day in Provence
makeup: Romeny Chan & Alice Bernman of Castor & Pollux
hair: Ashley Haley of Bang Bang Salon
dress: Sixpence Boutique
desserts: Shauna Younge Dessert Tables
stationery: Armato Design
model: Anne Murphey
Filed:
black,
cake,
candy,
dessert meets design,
dessert table,
gold,
graphic,
sydt,
truffles
3
Comments
Subscribe to:
Posts (Atom)