
Showing posts with label faux bois. Show all posts
Showing posts with label faux bois. Show all posts
Fall Dessert Table, Sketch, and Printables!
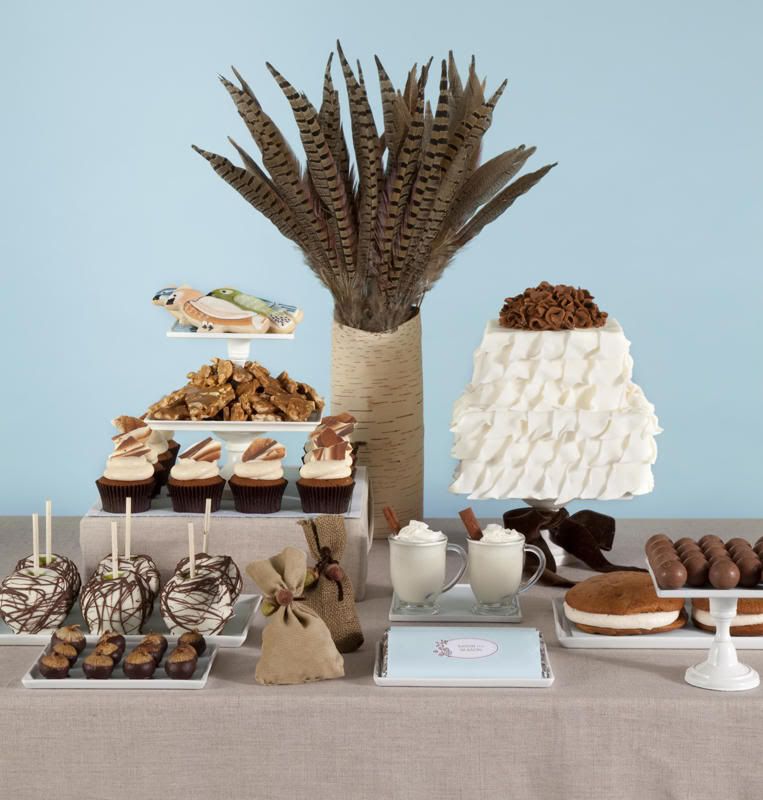
Remember this fall-inspired dessert table that I designed for Mpls St. Paul Magazine? Well, today you can visit Eat Drink Pretty to see the sketch of the table before the shoot and to print out the custom chocolate bar wrappers I designed. There are two versions of the wrapper, so be sure to check out both.
In case you missed it, you can also check out the tutorial to make the faux bois cupcake toppers. Have a great weekend!

Faux Bois Chocolate Tutorial
Yesterday, I showed you a few behind the scenes glimpses of Monday's magazine shoot. I also promised to show you how to make faux bois chocolate pieces that you can use to adorn cupcakes, the tops of cookies, or enjoy on their own. So, here's the tutorial.
You'll need a spoon, milk and white chocolate, cookie cutters of any shape, parchment paper, and a wood-graining tool. You can find the tool at paint stores. They're typically used to make wood grain patterns on walls.
 Step 1: After melting both types of chocolate in the microwave (Follow package directions), pour a ribbon of the milk chocolate onto the parchment paper. Drag the wood grain tool vertically through the chocolate and down the parchment. Using different sides of the tool will create different wood grain patterns.

 Step 2: Put the milk chocolate and parchment (use a cutting board to keep it steady) in the fridge for a few minutes until the chocolate has hardened. Once hardened remove from fridge.
Step 3: Pour ribbons of white chocolate across the milk chocolate grains. Using the back of the spoon, or offset spatula, or butter knife, gently spread the white chocolate across the milk chocolate to fill in the grooves made by the tool.

 Step 4: Put the parchment and chocolate back in the fridge to harden. Once hardened, remove and use your cookie cutters to make your shapes.
 Step 5: Voila! You faux bois chocolate shapes are now ready to use. You can store them in the fridge or freezer for months, if need be. Get creative with the shapes and sizes you make. You can attach the chocolate to your favorite desserts using a little dab of frosting. Frost a cookie, then use the same cutter to make the faux bois topper. Or, use the unique shapes as cupcake stoppers protruding from your little cake.
Here, I've made some leaf-shaped chocolates as well as rounds and shards.

 Aren't those Lil Fish Studios felt acorns cute? The leaf-shaped faux bois chocolates combined with the acorns would make a great cupcake topper.
Hope you enjoyed this tutorial. It's a very easy, fun project. I'd love to see what you guys use the faux bois chocolate for, so let me know!
Come back later today to see my guest post for another blogger. I'm sharing tips to help you create your own dessert tables. See you then!
You'll need a spoon, milk and white chocolate, cookie cutters of any shape, parchment paper, and a wood-graining tool. You can find the tool at paint stores. They're typically used to make wood grain patterns on walls.


Step 3: Pour ribbons of white chocolate across the milk chocolate grains. Using the back of the spoon, or offset spatula, or butter knife, gently spread the white chocolate across the milk chocolate to fill in the grooves made by the tool.


Here, I've made some leaf-shaped chocolates as well as rounds and shards.


Hope you enjoyed this tutorial. It's a very easy, fun project. I'd love to see what you guys use the faux bois chocolate for, so let me know!
Come back later today to see my guest post for another blogger. I'm sharing tips to help you create your own dessert tables. See you then!
Behind the Scenes: Mpls.St.Paul Magazine
Yesterday's Mpls.St.Paul Magazine shoot went really well, so I wanted to share a few behind-the-scenes shots that I was able to grab while we worked. The morning of the shoot, I made these faux bois chocolate rounds. They were very easy to make, so I'll be back with the tutorial for those tomorrow.
 Along with the rounds, I also brought the remnants to the set. You never know what will work best for the shoot, so it's good to bring everything. I like the sharp angles and abstract forms of these pieces.

When I arrived at the studio, I started setting up the table and unpacking the desserts while the photographer and I waited for the art directors to arrive.

 If you've never been on a commercial set, let me tell you, it's a flurry of activity. Along with the photographer, you usually also work with an art director, and sometimes there is also a stylist on set. Everyone on set has the same goal, to compose a shot that translates well in print, is impactful to the readers, and showcases the subject well.
For this shoot, I worked with photographer Steve Henke and two art directors from MSP Mag, Terri and Brian. Here, Steve and Terri (far right) check out the shot on the computer to see what adjustments we should make. Steve's daughter (left) hung out for the shoot, too.

Here, Terri and Steve make some adjustments while Steve and I study the shot onscreen.
 Although these adjustments (and there are many) can make for a lengthy shoot, I really enjoy the process. It's a very creative, collaborative environment. I'm very detail-oriented, so I get a kick out of discussing the minute details and components that go into styling a beautiful photograph.
It was great to work with everyone, but my favorite part of any commercial shoot is the food!
 I hope you all liked these little sneak peeks of my shoot yesterday. I can't wait to share the feature with you when it hits newsstands.
Tomorrow, I'll show you how to make those easy faux bois (simulated wood grain) chocolate rounds. I'll also be guest blogging elsewhere tomorrow, so I'll share that post with you as well. See you then!


When I arrived at the studio, I started setting up the table and unpacking the desserts while the photographer and I waited for the art directors to arrive.


For this shoot, I worked with photographer Steve Henke and two art directors from MSP Mag, Terri and Brian. Here, Steve and Terri (far right) check out the shot on the computer to see what adjustments we should make. Steve's daughter (left) hung out for the shoot, too.

After each shot, we all view it on the computer and make micro adjustments to improve the layout. We move things for all sorts of reasons. Perhaps a cupcake is casting a shadow that obscures a cookie or a candy dish is blocking a clear view of a platter.
Here, Terri and Steve make some adjustments while Steve and I study the shot onscreen.

It was great to work with everyone, but my favorite part of any commercial shoot is the food!

Tomorrow, I'll show you how to make those easy faux bois (simulated wood grain) chocolate rounds. I'll also be guest blogging elsewhere tomorrow, so I'll share that post with you as well. See you then!
Subscribe to:
Posts (Atom)
