Showing posts with label tutorial. Show all posts

DIY Divided Nautical Favor Box

You probably already know the always-fabulous Mrs. Lilien. Well, she's expecting baby #3, and we were thrilled to create these favor boxes for her nautical baby shower. We teamed up with the Candy Warehouse crew to fill each DIY favor box with four color-coded sweet treats.
DIY Nautical Candy Favor Box by Confetti Pop for Mrs. Lilien's baby shower | via Sweet Tooth
I love this bright, unexpected palette! Aqua and orange is so fun. 
DIY Nautical Candy Favor Box by Confetti Pop for Mrs. Lilien's baby shower | via Sweet Tooth
Swing by Confetti Pop to check out the tutorial, and hook your guests up with a variety of sweets.

Sweet Idea: DIY Color Blocked Cocktail Popsicles

I love, and I mean L-O-V-E, coconut rum mixed with lemon-lime soda and pineapple juice. I figured, what better concoction to add to a popsicle than a little splash of the good stuff? I whipped up these beauties last week for Confetti Pop, and they turned out lovely. They're look like a mix between watercolor and color blocking trends. Be still my heart!
Sweet Tooth | Sweet Idea: DIY Color Blocked Cocktail Popsicles by Confetti Pop (images: Todd Hafermann)

Check out the tutorial on Confetti Pop!

Dessert Meets Design: DIY Candy Heart Necklace

On a recent prop-shopping trip, I decided to let kiddo grab some candy from the 5 for $1 bin. For some reason, the Airheads were calling her name. So, she picked the white, orange, and pink, and we made our way to the register. A day later, I got an email from the good folks at Alt Summit that Airheads was running a Craft Your Valentine's contest (you can vote for me here), and a lightbulb went off. I didn't have time to make this craft before Alt, but today was the perfect time.

Using kiddo's remaining candy, I promised I'd make her a Valentine's treat. She was very excited, because she's my right-hand girl when it comes to sweet experiments. We came up with this easy, super affordable Airheads candy necklace! As you'll notice, she couldn't wait to take a bite.
Sweet Tooth DIY Airheads Candy Necklace
Sweet Tooth DIY Airheads Candy Necklace Steps
Sweet Tooth DIY Airheads Candy Necklace Gift
Sweet Tooth DIY Airheads Candy Necklace Gift Box
If you like this project, be sure to swing on by the Airheads Facebook Page, click on the contest tab, view the entries, and vote for me. Thanks!

Want to make an Airheads candy heart necklace for your little loved one? Check out the how-to.

Sweet Idea: DIY Glitter Candles

This has been a couple of weeks of kid-friendly crafts here on Sweet Tooth. First we had these number toppers, this striped number cake, these S'mores pops, then this baby shower place card holder. I found another cute, easy tutorial. This party-perfect idea by Jenny Batt of Hank & Hunt is a no-brainer. It's sparkly, fun, and customizable.
Check out Jenny's easy tutorial here.

pics by Jenny Batt for OCP

DIY Gumdrop Ornaments

Make your holiday a true candy land this year. Ok, maybe not the entire living room should look like a gingerbread house, but a few sweet treats on the tree could be swell. Jenny from Hank + Hunt made these gumdrop ornaments for The Sweetest Occasion, and they're pretty dang cute, don't you think?
Is the tree already decked out? Use them as place cards instead.
Get the step-by-step details (They're soooo simple, you'll love it!) at The Sweetest Occasion.

pics by Jenny of Hank + Hunt

Sweet Idea: DIY Smash Cake

I love this idea so much that I did something similar for my little one's first birthday. I knew she'd make a complete mess of any cake that we gave her, so I made a little one just for her. The rest of us happily feasted on cake free of baby drool. This tutorial by Jenny for Hello Bee shows you how to make your very own smash cake.
Enjoy!

DIY Ice Cream Cone Mobile

Isn't this one of the coolest things? I don't know if mobile is right, or is this more a garland sort of thing? Maybe we should just say, "It's raining ice cream!" Either way, this tutorial from Icing Designs is perfect for a summer ice cream social.
Swing by Icing Designs for the surprisingly simple tutorial.

Tutorial: How to Frost a Cupcake

Ever wonder how to achieve those bakery-perfect looking cupcakes? It's not as difficult as you'd think, thanks to a tutorial from Glorious Treats. This frosting how-to will walk you through the easy-as-pie steps.
Happy frosting!

Tutorial: Painted Ombre Cookies

I was creating the October gift guide for my husband's blog, Well-Groomed, and came across this yummy tutorial. Decorating cookies is a lot easier than you'd think. Remember these monogram chalkboard cookies I created? Well, this ombre cookie tutorial from The Sweet Adventures of Sugar Belle is just as simple with equally stunning results.
Use a paper guide to keep your lines straight and apply your gradients of color to each third of your cookie.
As with all stenciled designs, I love that this allows you to create a clean design without a super-steady hand or years of practice. Isn't this delicious?

Looking for more ombre sweets? Check out this and this classic Sweet Tooth post.

Tutorial: Halloween Donut Tree

I love donuts for all kinds of parties. Need proof, just check out this recent donutty posts I wrote. Well, I'm back with another idea that incorporates the childhood treat. One Charming Party featured this inexpensive, easy donut tree craft in perfect time for Halloween.
All you need is a styrofoam cone, which you can get in the floral section of most craft stores, frosting, a large pastry brush, and toothpicks. Simply coat your cone with a thin layer of frosting, insert toothpicks, and hang donuts. Voila!

This is such a quick, simple project that you could easily complete it the day of your Halloween bash and still have time to relax before guests show up.

DIY Number Pinata Tutorial

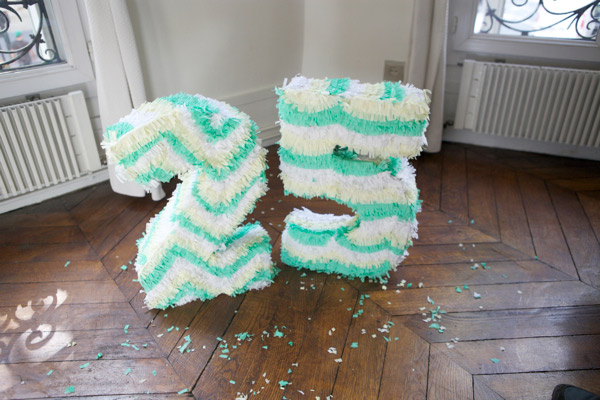
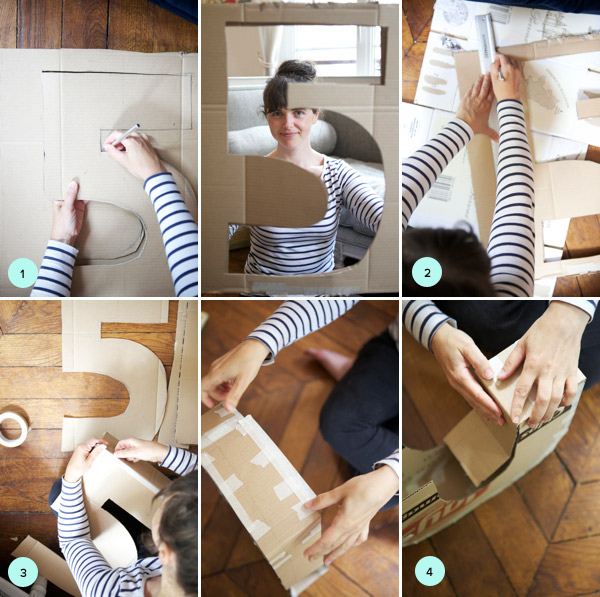
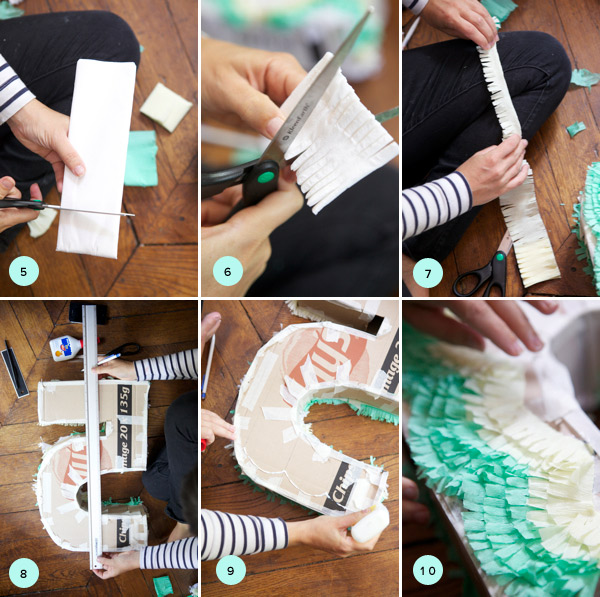
Let's face it, sometimes it's not really a party without pinatas. In the past, we talked about these unconventional pinatas and garlands, and I shared this DIY mini pinata tutorial with you. Well, perhaps you wanna go big. Really big. This tutorial for DIY number pinatas from Oh Happy Day is perfect for birthdays and anniversaries. And really, isn't it just the best way to present a trough-load of candy?
Check out Oh Happy Day for the step-by-step directions.

Tutorial: DIY Cupcake Liner Flowers

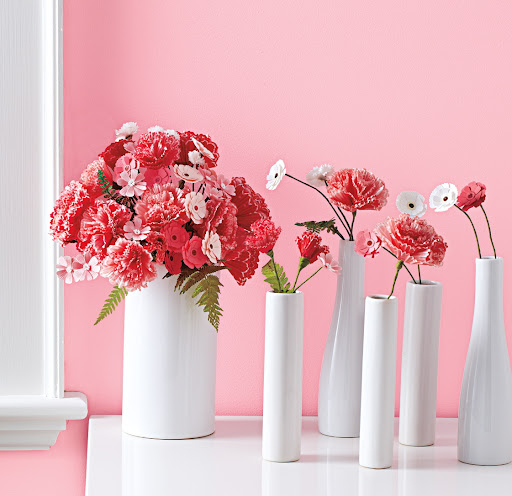
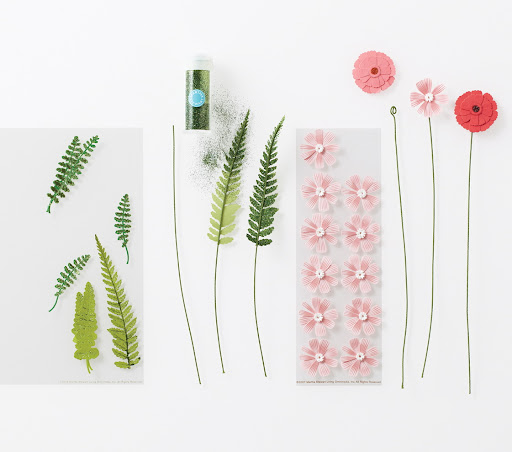
This bouquet was made from cupcake liners and stickers! It's amazing, right? Well, The Crafts Dept. over at Martha shared this project. Even better? You can get all of the supplies at Jo-Ann (and probably online from marthastewart.com).
Start with some simple, store bought supplies to create this pretty look. Keep reading to get the how-to.

Spring Garden Bouquet Instructions
Tools and Materials
Floral wire
Fern stickers
Golden Beryl glitter
Floral tape
Needle-nose pliers
Hot-glue gun and glue sticks
Flower stickers
Large and mini cupcake liners
Ferns How-To:
You’ll need 1 piece of wire and 1 sticker per fern.
1. Attach wire to adhesive back of fern. Secure with additional glue.
2. Apply glitter to back of sticker. Bend to create an organic shape. Cover the stem of the wire with floral tape.
Sticker Flowers How-To:
1. Use pliers to twist wire into a spiral. Bend spiral 90 degrees to make a platform.
2. Hot-glue flower stickers onto the platform.
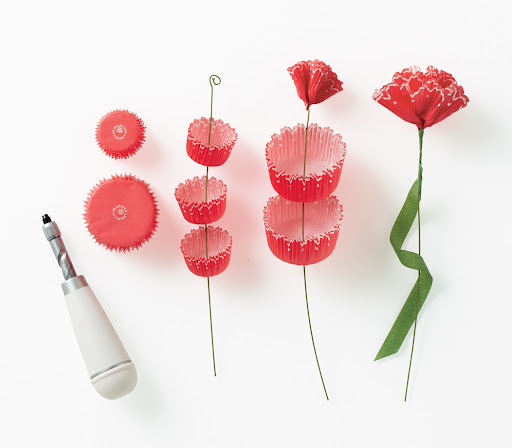
Cupcake Wrapper Flowers How-To:
1. Repeat spiral wire technique (1 per flower).
2. Use the screw punch to punch a hole in the center of 3 mini and 2 large cupcake liners. (Add more for a more voluminous flower).
3. Insert the spiral end of the wire through the 3 mini liners, and adhere with hot glue. Pinch the bottom of the liner to secure and create a natural flower shape. Let dry.
4. Add the 2 large liners under the minis and repeat. Secure the pinched end with floral tape and continue wrapping to the bottom of the wire.

DIY Chalkboard Cake Toy

I recently redid my little one's bedroom, and one of the projects I tackled was making a chalkboard table for her to color on. Well, since she's my kid, she's always surrounded by desserts and likes to build cakes from the styrofoam dummies in my office. When I saw this Craft tutorial for a chalkboard cake toy, I just knew this would be a great next project. It's inexpensive, easy, and my girl would just love decorating it.
Simply glue together some nested boxes, prime, and paint with chalkboard paint. Wait for it to dry, and then your little one can decorate again and again. Ready to tackle the task? Check out the tutorial here.

Tutorial: From Cupcake to Mini Cake

This mini cake is just too adorable. Simply stack two cupcakes end-to-end and frost. It doesn't get much simpler than that.

Need a little more guidance? Check out video tutorial on The Happy Mom Blog.

Chalkboard Cookie Tutorial

I didn't realize how much you all would love the chalkboard cookies I designed for the Graphic + Glitz dessert table. Many of you have asked for a tutorial, and I found some time to do a little demo yesterday. You'll notice that the original cookies were squares, but the ones I used yesterday were some rounds that I already had on-hand. You'll be pleasantly surprised at how easy these designs are to create. We talked about dessert stencils last week, and this tutorial relies on custom stencils. Enjoy!


You'll only need a few simple tools for this DIY. It's so simple!

Supplies:

printer & paper
X-acto knife
parchment paper
condiment bottle
royal icing for cookies
baking supplies from Bake It Pretty
- square cookie
- black coloring
- white lustre dust
extract of your choice

Directions:

Bake your cookies and allow them to cool. Prep your royal icing and tint with black coloring. Flood your cooled cookies with the royal icing and allow to set.

Choose a font and print a 1" letter of your choice on regular printer paper. Using a fine-tipped marker, trace your letter onto parchment paper.

Use your X-acto knife to cut out your stencil. Remember to cut out the part of the letter you want to fill in with "chalk". For the O, I left a small strip of paper attached at the top and bottom of the center of the O to keep it in place while I filled in the stencil (see image #4).

Dip a toothpick into your extract, then sprinkle the open areas of the stencil with lustre dust. Using the toothpick as a pencil, gently fill in the stencil. Typically, you would use a brush to apply the lustre dust, but in our case, we want the definitive chalk-like strokes that the toothpick gives rather than a smooth finish of a brush.

Set aside an allow to dry.

image 1 & 5: paper antler

Guest Desserts: DIY Sailboat Cupcake Toppers

Today's Guest Dessertst feature was submitted by Melissa of Faux Martha. She sent me this adorable sailboat cupcake topper tutorial. She made the toppers to coordinate with this sailboat baby shower invite that she designed and is offering for free download. Check out Melissa's step-by-step handiwork, and get the how-to for this cute project.


Thank you so much for submitting this great tutorial, Melissa! I love how the sailboat theme is carried throughout the event. It's so cute, and not a theme you see very often for baby showers. Very clever.

Want to give this simple DIY a try? You'll only need a few supplies. And, if you have a recipe, project, or giveaway to share, check out the Submissions page to see yourself featured on Sweet Tooth.


Supplies:


• Plaid Cupcake Liners from Bake it Pretty
• White Cupcake Liners (Always double up your liners so you can actually see the pretty liner. If you use one liner, when the cupcake bakes, the color of the cupcake will bleed into the liner thus losing its pretty pattern.)
• Wooden Skewers
• Wire Cutters
• FauxMartha Cupcake Sail Pattern
• Printer
• Textured, cardstock weight paper
• Scissors
• Exacto Knife
• Cutting Board
• Colored Duck Tape (or colored masking tape)


Instructions:
1. Make and bake your cupcakes, using a recipe of your choice. Remember to use 2 liners. Place the white liner inside the plaid liner. Allow cupcakes to fully cool before icing and decorating.
2. Meanwhile, cut wooden skewers about 5″ long using wire cutters or some other cutting utensil. Keep the side with the pointed end. Don’t worry if the wood begins to fray where you made the cut. We will cover that up shortly.
3. Print out the FauxMartha Cupcake Sail Pattern on textured cardstock. Cut out each sail. Using the longest side of the triangle (not the angle), cut an “x” at the top and bottom on a cutting board. Insert pointed end of wooden skewer into the top “x” on the printed side. Continue to insert the skewer through the second “x”.
4. Cut thin 1/2″ strips of duck tape. Place tape on the top of skewer where you made your original cut. Evenly fold over. Make 2 diagonal cuts to achieve a flag. Push sail up to give it that curved wind blown look.
5. Ice your cupcakes with the frosting of your choice. I use the Wilton Dessert Decorator Pro to ice my cupcakes. In order to get the thick swirls, I don’t use a tip. Place pointed end of the sail into cupcake and you’ve got yourself a cute sailboat cupcake!

DIY Mini Pinatas

This DIY project is one of my favorite yet. Nothing says "candy" quite like a pinata, and nothing says "cute" quite like tiny stuff. So, these DIY mini pinatas via Ruffled are the perfect storm of party favor greatness. Some balloons, papier mache, and tissue paper is really all you need to create this craft.
This project makes me want to create a Cinco de Mayo dessert table. Any kid would be thrilled to get their own tiny pinata, don't you think?
Related Posts Plugin for WordPress, Blogger...