Cake Balls of Every Size

I'm kind of in love with this twist on cake balls. This creation by Maki's Cakes showcases cake balls of various sizes nestled on a tiered stand. It's cool that the balls have different piped designs, but the variety of size really allows guests to grab one to fit their appetite. I mean, who says that a cake ball has to be golf ball sized?

What do you think of the variety of cake balls?

DIY Golden Animal Cupcake Toppers

This has got to be one of the least expensive DIYs ever. Plastic animals, candle holders, and gold spray paint come together to create cute, customized cupcake toppers. This adorable, easy tutorial via {this is glamorous} was just too cute to pass by.

Want to make these shimmery toppers for yourself? They're perfect for a kids party or an animal lover. You could choose different breeds of dog or little peacock figurines for a cool touch.

Directions:

1. use any type of plastic animal you can find, keeping in mind the size of the cake or cupcake you are planning to top; ones with a flat back work best

2. with the pliers, hold the animal steady, and drill a hole straight down, being careful not to come out the other side; the hole only has to be deep enough for the candle holder to fit

3. spray paint the animals in a few light coats, rotating them to cover all sides; note: gold/metallic spray paint will work fine without primer, but if you are using regular spray paint for colour variations, be certain to use a plastic spray paint or a primer for plastic, and always test one first

4. spray the candle holders to match

5. put on your dancing shoes & pop open the champagne

images via {this is glamorous}

Dessert Table: Homespun & Heavenly

This dessert table has the un-fussiest, carefree vibe of any I've seen before. Want proof? The cupcakes remain in their baking trays and quilts that look like they've been hand-stitched by Granny stand in as mismatched, happy backdrops. Photog Jenny Haas captured these gorgeous images. The pics are sunny and full of light, which highlights each uniquely pretty cake.


DIY Pie Pop Favors

Any time you can take a traditional dessert and make it tiny, it immediately becomes exponentially more enticing. These mini pie pops from Borrowed and Bleu are an easy DIY that would make a big impression. Just imagine these cuties at a small family gathering. Each guest could get their own little piece of flaky perfection...on a stick!
You can check out the full recipes and tutorial here, and the best part is that you pre-made pie crusts from the freezer section. Yeah, it might not be as impressive as making them from scratch, but it makes tackling the project more attainable if you're short on time.

DIY Number Pinata Tutorial

Let's face it, sometimes it's not really a party without pinatas. In the past, we talked about these unconventional pinatas and garlands, and I shared this DIY mini pinata tutorial with you. Well, perhaps you wanna go big. Really big. This tutorial for DIY number pinatas from Oh Happy Day is perfect for birthdays and anniversaries. And really, isn't it just the best way to present a trough-load of candy?
Check out Oh Happy Day for the step-by-step directions.

Recipe: Gumdrop Favors

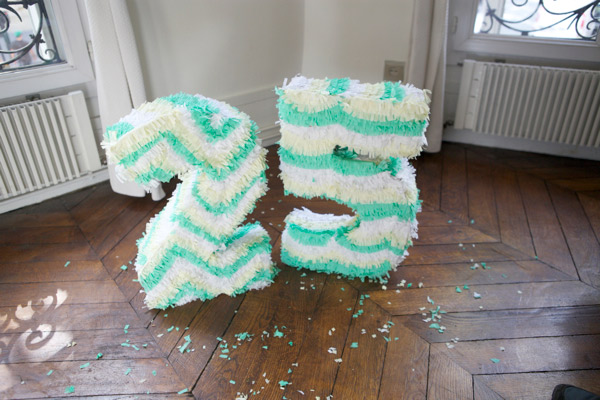
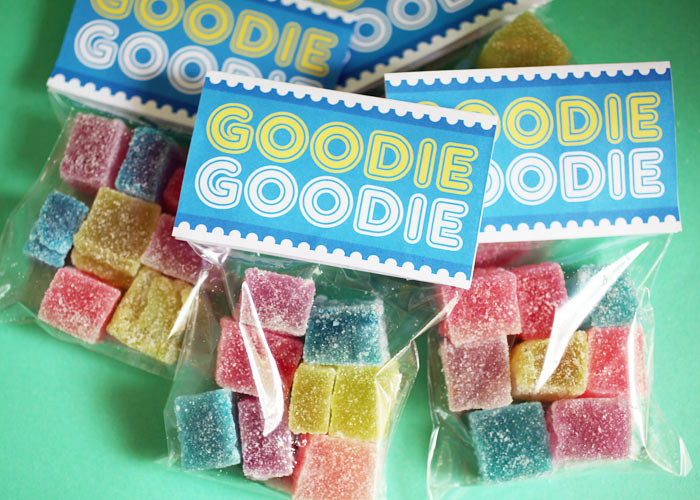
If you've never worked with gelatin (not to be confused with Jell-o), then you're missing out on lots of easy, great recipes. Bakerella shared 
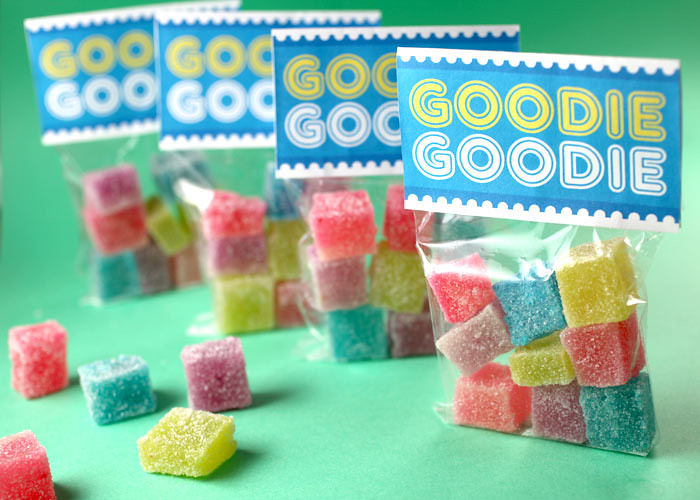
this one for homemade gumdrops, which can be bagged for cute favors.
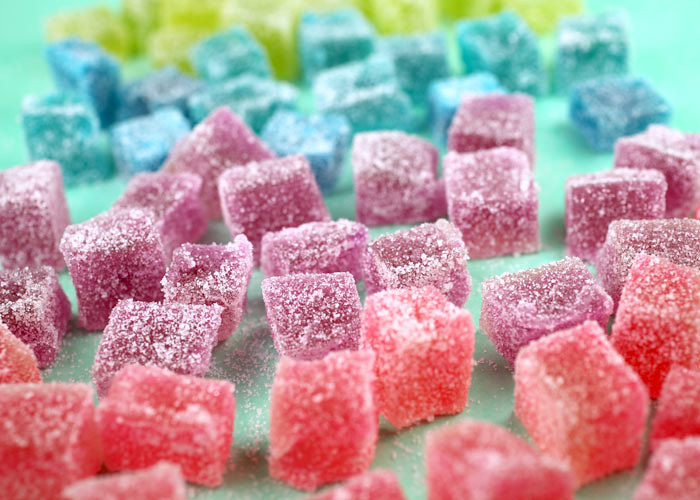
Just look at how sparkly and pretty these are. Want to try some for yourself? Check out the recipe and even print the favor labels for yourself!

Goodie Goodie Gumdrops (Makes about 8 dozen 3/4 inch gumdrops)


Supplies:


4 Tbsp gelatin (that’s about 6 envelopes)
1 cup cold water
1 1/2 cups boiling water
4 cups sugar
1/4 tsp flavored extract like lemon or peppermint
1-2 drops food coloring (I used four colors)
extra sugar for coating
……………………………………………
3.75 X 6 inch treat bags
Goodie Goodie labels (print the 
Goodie Goodie pdf)
In a large pot, soften gelatin in cold water for five minutes. Stir in boiling water until gelatin dissolves. Stir in sugar. Bring to a boil over medium-high heat and boil for 25 minutes. Stir constantly. Pour mixture into 4 – 3X5 pans. Add 1/4 tsp extract and 1-2 drops food color to each pan. Stir until thoroughly combined.
Cover pan and chill overnight in the fridge.
Cut gelatin mixture into 3/4 inch cubes using a knife dipped in hot water. The gelatin may pull, but continue cutting. Separate cubes and roll in sugar until coated on all sides. Place gumdrops on wax paper and leave at room temperature for two days to crystallize.
Store in an airtight container.
Adapted from the book, Celebrating Candy

Dessert Table: Lemon Lime Licious

When she likes sweet and he likes salty, it only makes sense to create a dessert table that includes lots of both. This lemon lime hued spread was captured beautifully by Lemon Lime Photography, which was designed by Sandra Denneler. Cupcakes, M&Ms, macarons, and jelly beans are just a few of the sweets on this citrus-y display.

Tiered Cake Pop Stand

I'm always excited to come across new ways to display desserts, so I was intrigued when I saw this tiered cake pop stand on Pinterest. Each wooden tier has drilled holes to support the pop sticks and a chalkboard menu lets guests know which flavor is which.
Don't you think this is a clever idea?

Ombre Donut Cake

I've seen plenty of dessert tables that feature cakes and donuts. I've even seen donuts stacked to resemble tiered cakes, but I don't know if I've seen a cake covered in donuts before. This one by Sweet and Saucy features iced donuts in subtly different shades of orange.
What do you think of this combo?


Be sure to check out this and this other previous post about creative dessert hybrids.

images by Gabriel Ryan Photography via Camille Styles

Guest Desserts: Cake Banner Printable

Melissa of The Faux Martha has submitted a couple of great Guest Desserts goodies to Sweet Tooth, and she's back with another one. This printable cake banner's "Congrats!" message can be used for birthdays, weddings, graduations, really any celebratory event. In case that sentiment doesn't really fit your intentions, there's also a blank version of the banner that you can print on pretty patterned paper and add your own message.
Thanks for another great Guest Desserts submission, Melissa! I can't wait to see what you come up with next.

Want to give this simple DIY a try? You'll only need a few supplies. And, if you have a recipe, project, or giveaway to share, check out the Submissions page to see yourself featured on Sweet Tooth.

How-to:1. Make a chocolate chip cake, or another one of your choosing.
2. Pick out some pretty scrapbook paper. It needs to be able to run through your printer and light enough in color so you can see the ink when you print.
3. Download the cake banner template.
4. Print the template on your pretty paper.
5. If you have crayons lying around the house, pick one color and do a little shading within the letters.
6. Trim out leaving the edges visible. (We’re going shabby chic here.)
7. Adhere banner to skewers or something similar.
8. Adorn your cake and celebrate!

Photogenic Cookies

Whether your fave photog is a pro that takes your annual family photo, a wedding specialist, or just an enthusiastic friend who records every moment of every event, these cookies by Manjar Sweets would make fitting thank you gifts.
image via Eat Drink Chic

Tutorial: DIY Cupcake Liner Flowers

This bouquet was made from cupcake liners and stickers! It's amazing, right? Well, The Crafts Dept. over at Martha shared this project. Even better? You can get all of the supplies at Jo-Ann (and probably online from marthastewart.com).
Start with some simple, store bought supplies to create this pretty look. Keep reading to get the how-to.

Spring Garden Bouquet Instructions
Tools and Materials
Floral wire
Fern stickers
Golden Beryl glitter
Floral tape
Needle-nose pliers
Hot-glue gun and glue sticks
Flower stickers
Large and mini cupcake liners
Ferns How-To:
You’ll need 1 piece of wire and 1 sticker per fern.
1. Attach wire to adhesive back of fern. Secure with additional glue.
2. Apply glitter to back of sticker. Bend to create an organic shape. Cover the stem of the wire with floral tape.
Sticker Flowers How-To:
1. Use pliers to twist wire into a spiral. Bend spiral 90 degrees to make a platform.
2. Hot-glue flower stickers onto the platform.
Cupcake Wrapper Flowers How-To:
1. Repeat spiral wire technique (1 per flower).
2. Use the screw punch to punch a hole in the center of 3 mini and 2 large cupcake liners. (Add more for a more voluminous flower).
3. Insert the spiral end of the wire through the 3 mini liners, and adhere with hot glue. Pinch the bottom of the liner to secure and create a natural flower shape. Let dry.
4. Add the 2 large liners under the minis and repeat. Secure the pinched end with floral tape and continue wrapping to the bottom of the wire.

Ice Cream Meets Macarons

Let me just start by saying, I LOVE this idea. I've seen ice cream macarons before, but I didn't know there was a company out there that was selling them pre-made. Jeni's Splendid Ice Cream creates these little treats. I'm curious to try the Orchid Vanilla flavor. Honestly, nothing sounds better to me than the crunch of a macaron shell combined with the cold, sweetness of ice cream.
image via Jeni's Ice Cream
Related Posts Plugin for WordPress, Blogger...