Showing posts sorted by relevance for query graphic and glitz. Sort by date Show all posts

Dessert Meets Design: Graphic & Glitz Pt I

Yesterday, I gave you a sneak peek at the inspiration board that inspired the dessert table I designed for a collaboration with  Maddy Hague of Inspired Bride, Amy Hardy of Design 8 Days, and Jonny and Michelle Hoffner of paper antler. Today, I'm back with part one of the Graphic & Glitz post. 

As you already know, this design had a soft pink, shimmery gold, and bold black palette that was accented with chevrons and gorgeous calligraphy. For this dessert buffet, I created custom candy bars, custom popcorn boxes, and chevron favor bags that coordinate with the invitation suite. I also made monogrammed chalkboard cookies, custom star lollipops, and twine-tied favor boxes. 


Every time I design a dessert table, I try to make it really fit with the design of the overall event, so hopefully that's evident in this design, too.

I worked with so many great vendors and creatives for this shoot. Please take a few minutes to swing by their blogs and check out their posts as well.


Concept and Styling - Maddy Hague of The Inspired Bride
Photography - paper antler
Dessert Table - Shauna Younge Dessert Tables 
Paper Goods Design - Amy Hardy of Design 8 Days
Hair and Makeup - Rene Rattler of Moore Creative Talent, Inc.
Location - MPLS Photo Center 
Calligraphy - Crystal Kluge
Wardrobe - Flutter Boutique
Wholesale Flowers - Fifty Flowers
Twine - The Twinery
Vintage Stamps - Verde Studio
Baking and Candy Making Supplies - Bake It Pretty
Ribbon candy, puffs, & pillow mints - Hammond's Candies 
Jelly beans, golden Jordan almonds, golden hearts, rock candy, M&Ms, fruit slices, malt balls, candied sunflower seeds - Oh! Nuts
Macarons and Cake - Cocoa & Fig
Marshmallows - Laura's Candy

Sweet Advice: How Do I Get Business?

I get a lot of emails from readers who are trying to start their own dessert businesses. This week, I got a Facebook message from Briana, so I figured I'd share my response here with all of you.

Briana asked, "I'm curious to know if there is any advice you can share with me on how I can attract event planners and corporate clients as a new and upcoming business?"
Sweet Tooth | Watercolor Me Lovely ombre dessert table by Shauna Younge
Thanks for the question, Briana! When I started out, I was a new stay-at-home mom looking for a job that would give me the flexibility to stay home and still be creative and involved in the "real" world. I didn't have any connections in the event industry or any experience. What I did have was time to pull together a portfolio of my dessert tables, which were examples I created in my home, and time to rove the internetz.
Sweet Tooth | Graphic + Glitz dessert table by Shauna Younge
I met Maddy Hague online about three years ago. We chatted a few times, then met up for dinner one day. Since then, we've worked on a ton of projects together and even became business partners a few months ago when we launched Confetti Pop. We followed these same steps when we started CP, and The Style Lab, which starts next week. These tips have worked for me time and again.

1) Get to Know the Pros: Learn about the event industry, planners, and other professionals in your area.

2) Be Proactive: Don't wait for them to find you. Engage with them via social media. If they have a funny tweet, respond. If you like one of their Facebook pics, let them know. I have several followers, one who lives in Kuwait, that are very active in the comments section, on Instagram, and Twitter.

3) Jump at Opportunity: Any time you can meet people or show your work, jumped at it wholeheartedly. Just be careful that you don't lose money and weigh the pros and cons before accepting a free gig.
Sweet Tooth | Customized sweets by Shauna Younge Dessert Tables
I hope that helps, Briana. Thanks for your question, and for introducing yourself on Facebook. Feel free to engage on Twitter, Pinterest, and Instagram, too.

Dessert Meets Design: Graphic & Glitz Pt II

Hopefully, you loved the first part of today's Graphic & Glitz post. I'm back with even more yummy pics of the dessert table I designed, Amy's paper goods, Maddy's styling, and Jonny and Michelle's photo skills. Here are a few more images of the custom candy bars, popcorn boxes, cookies, and lollipops I made. Enjoy!


What's your favorite part of the shoot? Don't worry, I won't be offended if it's not something from the dessert table.

100 Layer Cake has kindly featured this shoot on their blog as well, so be sure to check out their post for even more pics!


Concept and Styling - Maddy Hague of The Inspired Bride
Photography - paper antler
Dessert Table - Shauna Younge Dessert Tables 
Paper Goods Design - Amy Hardy of Design 8 Days
Hair and Makeup - Rene Rattler of Moore Creative Talent, Inc.
Location - MPLS Photo Center 
Calligraphy - Crystal Kluge
Wardrobe - Flutter Boutique
Wholesale Flowers - Fifty Flowers
Twine - The Twinery
Vintage Stamps - Verde Studio
Baking and Candy Making Supplies - Bake It Pretty
Ribbon candy, puffs, & pillow mints - Hammond's Candies 
Jelly beans, golden Jordan almonds, golden hearts, rock candy, M&Ms, fruit slices, malt balls, candied sunflower seeds - Oh! Nuts
Macarons and Cake - Cocoa & Fig
Marshmallows - Laura's Candy

Dessert Table: Storybook Baby Shower

It's looking very Spring-y around here, and that means lots of baby showers. This storybook baby shower theme from Martha Stewart is a really cute idea, and the book garland would be great over a dessert table.

If you've been reading the blog for a while then you'll immediately notice the flag cake toppers like these and these. I also like the unfrosted cupcakes with the star toppers. They'd go really with these custom star lollipops I made for the Graphic and Glitz dessert table.


Aren't those lamb cookies just the sweetest thing? Since there isn't a lot of detail to them, they'd be really simple to make at home.

Golden Quilled Cake

I've always been fascinated by quilling. The idea of taking simple strips of paper and transforming them into 3D art is just so cool to me. And I must admit, my Graphic & Glitz dessert table still has gold food on my mind. Imagine my joy when I found this Sweet and Saucy cake that combines the art of quilling with edible gold. In case you're not familiar with quilling, here are a few examples.
On an unrelated note, I'd like to thank all of you for your kind words and positive responses to my latest dessert table. Several of you have asked for info about how I made the chalkboard cookies, and I'll try to put together a tutorial soon. Some of you have also asked where you can buy the chevron patterned favor bags. I designed them myself, so unfortunately they aren't available in stores. I'm gearing up for wedding season, so things are a little bit hectic right now, but I'll definitely put that on my to-do list. I'm so glad you guys liked my Graphic & Glitz design!

quilling examples via FFFT

Sweet Advice: What Desserts Do I Serve?

You you know I'm all over the interwebs connecting with you guys about all kinds of things. Today, I'm responding to one reader's question that I got on Facebook.

Keri said, "Hi Shauna, I'm a fan from Seattle. I'm doing a dessert table for a 1 yr old's party for about 20 people. I was trying to figure out how many types of dessert I should do and how many of each dessert. Can you recommend what desserts would make a well-rounded dessert table?"

Hi Keri, thanks for the question! I have some bad news, there's no right answer for this because your group of 20 is different from any other group of 20. But, I can give you a little help. Since this party will probably have a lot of kids in attendance, make the desserts small, easy to eat, and simple. This isn't the time for cheesecakes and pavlovas. Choose desserts that spark childhood nostalgia for the adult guests, and they'll also please the little ones. Cupcakes and cookies are timeless classics. If you want to add a sophisticated vibe that's still kid-friendly, consider macarons.


With kids, you want to be aware of any food no-nos. A 1 yr old shouldn't eat any dessert with raw honey. Also avoid choking hazards that might get in the wrong hands, like gum balls, popcorn, and hard candy. With any group, you want to be sensitive to people's allergies or dietary restrictions. A lot of kids have nut allergies, and older guests may be diabetic and need sugar free options.

As far as quantity goes, remember that some guests won't eat any dessert (crazy people), some will eat one or two items, and some people (sugar addicts like me) will eat one of everything. You don't need twenty of every treat. Instead, make sure the more common/popular items are represented in larger quantities than unconventional items/flavors.

image 1: Graphic + Glitz (photo by paper antler), image 2: Sweetly Surprised (photo by Emily Steffen)

Chalkboard Cookie Tutorial

I didn't realize how much you all would love the chalkboard cookies I designed for the Graphic + Glitz dessert table. Many of you have asked for a tutorial, and I found some time to do a little demo yesterday. You'll notice that the original cookies were squares, but the ones I used yesterday were some rounds that I already had on-hand. You'll be pleasantly surprised at how easy these designs are to create. We talked about dessert stencils last week, and this tutorial relies on custom stencils. Enjoy!


You'll only need a few simple tools for this DIY. It's so simple!

Supplies:

printer & paper
X-acto knife
parchment paper
condiment bottle
royal icing for cookies
baking supplies from Bake It Pretty
- square cookie
- black coloring
- white lustre dust
extract of your choice

Directions:

Bake your cookies and allow them to cool. Prep your royal icing and tint with black coloring. Flood your cooled cookies with the royal icing and allow to set.

Choose a font and print a 1" letter of your choice on regular printer paper. Using a fine-tipped marker, trace your letter onto parchment paper.

Use your X-acto knife to cut out your stencil. Remember to cut out the part of the letter you want to fill in with "chalk". For the O, I left a small strip of paper attached at the top and bottom of the center of the O to keep it in place while I filled in the stencil (see image #4).

Dip a toothpick into your extract, then sprinkle the open areas of the stencil with lustre dust. Using the toothpick as a pencil, gently fill in the stencil. Typically, you would use a brush to apply the lustre dust, but in our case, we want the definitive chalk-like strokes that the toothpick gives rather than a smooth finish of a brush.

Set aside an allow to dry.

image 1 & 5: paper antler

Taking A Break & MN Bride Feature

Before I go, I'll leave you with this Graphic + Glitz (part I and II) photo shoot which is featured in the latest issue of MN Bride magazine. Swing by your newsstands to grab a copy of the Spring/Summer 2012 mag.


Concept and Styling, Maddy Hague of the Inspired Bride /  Dessert Table Design – Shauna Younge Dessert Tables / Paper Goods Design – Amy Hardy of Design 8 Days / Hair and Makeup – Rene Rattler / Location – MPLS Photo Center / Calligraphy – Crystal Kluge / Wardrobe – Flutter Boutique / Wedding Dress – Jenny Yoo / Bride’s Headband – Bride’s Head Revisited / Bride’s Clutch – Ila Handbags / Bridesmaid’s Dress – Priscilla of Boston / Wholesale Flowers – Fifty Flowers / Twine – the Twinery / Vintage Stamps – Verde Studio / Dessert Table Baking and Candy Making Supplies – Bake It Pretty / Dessert Table Candies – Hammond’s Candies and Oh Nuts! / Macarons and Cake – Cocoa & Fig / Marshmallows - Laura’s Candy

Week In Review & Banana Split Bombe

This Banana Split Bombe looks amazing, and perfectly cool for a hot summer day. If you have a glass bowl, a few pints of ice cream, and a cake recipe (or boxed cake), then you can make this and really wow guests at the next get-together.
This week on Sweet Tooth:

I really liked the creativity of the garland for this storybook dessert table.
I learned that cake stencils can be simple for birthday cakes, or really elaborate for weddings.
We chatted on Facebook about the simple beauty of this dessert table.
I liked how well white, milk, and dark chocolate were worked into this chocolate-y design.

This week on The Sweet Life, I wrote this post about Chocolat Celeste's new venture and free truffles.

I'll be back next week with the chalkboard cookie tutorial from the Graphic & Glitz shoot that many of you have been asking for, so be sure to check back on Monday. If you missed the cookies from the original post, you can see them here and here.

Have a great weekend!

image Martha Stewart via Pinterest

Neapolitan Notions

Warm weather always stirs up a longing for ice cream and other cool treats. These Neapolitan goodies turn the classic ice cream flavor into unexpected desserts. I've also been a big fan of a pink and chocolate brown color palette. It's feminine, but not too girly.
I really like the popsicles. I remember making my own popsicles as a kid and mixing and matching flavors and colors. What an easy lazy-day project to do with the kids. Plus, if you use natural fruit juices, you won't feel nearly so guilty about eating two (or five) every day. 

On an unrelated note, I'll be making the Graphic + Glitz chalkboard cookies today. Depending on exactly when I finish them up, I'll either post them later today or first thing tomorrow. 

cake via Pinterest, cheesecakes via Bakers Royale, popsicles via Pinterest, cookies and milk via Sweetapolita, chocolate bar via Chocolate Editions

Sweet Inspiration: Graphic & Glitz

I'm so excited to share a shoot with you tomorrow. I collaborated with Maddy Hague of Inspired Bride, Amy Hardy of Design 8 Days, and Jonny and Michelle Hoffner of paper antler. I thought I'd give you a sneak peek of the inspiration behind the shoot.
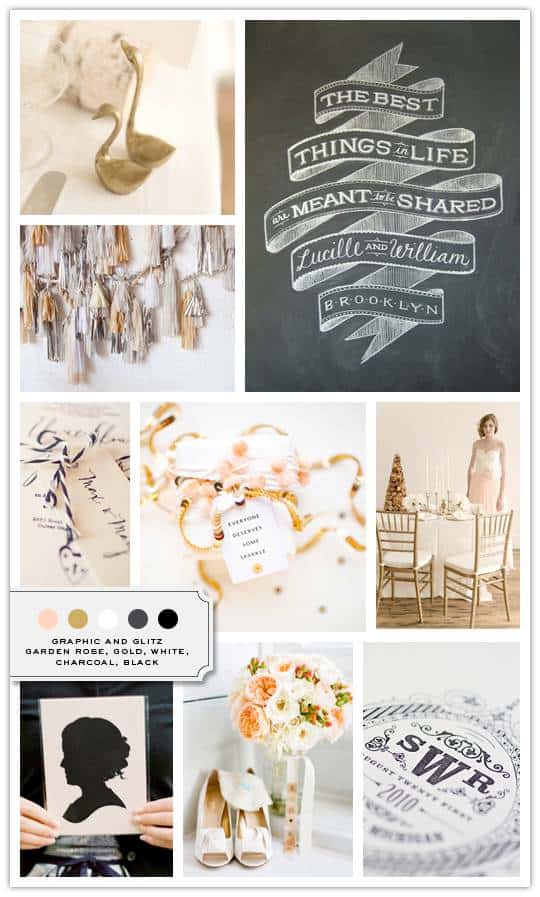
Maddy created this inspiration board a few weeks ago, and our team of creatives used it as a starting point for our shoot.
So, prepare yourself for a lot of gold, pink, and black tomorrow, because that's exactly we we have in store. See you tomorrow.

Oh, and don't forget to let me know what you think of the new series we started yesterday. Check out the first Sweet Brands post here.

Dessert Meets Design: Southern Weddings Sneak Peek

I teamed up with the creative team that I collaborated with for the Graphic + Glitz (Part I and Part II) shoot again, and we created an inspirational wedding for Southern Weddings Magazine. The issue landed in mailboxes last week, and is probably on newsstands across the country by now, so I figured I'd share a few pics of the spread.


I'll be back in a hot second to share some lovely, detailed close ups of our shoot. See you soon!

images: paper antler.
Related Posts Plugin for WordPress, Blogger...